
What Is a Tick?
Ticks are small, blood-sucking parasites that belong to the arachnid family, which also includes spiders and mites. These tiny creatures can be found in wooded or grassy areas and are notorious for their ability to latch onto animals and humans alike. Ticks are often less than a quarter of an inch long, making them easy to overlook, but their presence can pose significant health risks.
Types of Ticks
There are several species of ticks, but the most common ones include:
- Deer Tick (Ixodes scapularis): Known for transmitting Lyme disease.
- American Dog Tick (Dermacentor variabilis): Can spread Rocky Mountain spotted fever.
- Brown Dog Tick (Rhipicephalus sanguineus): Primarily affects dogs but can also bite humans.
- Lonestar Tick (Amblyomma americanum): Associated with various diseases, including ehrlichiosis.
Understanding the type of tick you are dealing with is crucial, as different ticks carry different diseases. This knowledge can help you take the right steps for removal and prevention.
How Do Ticks Attach?
Ticks are equipped with specialized mouthparts that allow them to attach firmly to their host. They typically crawl onto a host and find a suitable spot to bite, often in warm, hidden areas like the armpits, groin, or behind the ears. Once attached, they can feed for several days, which is why it’s essential to know how to remove a tick promptly.
Why Remove a Tick Promptly
Removing a tick quickly is vital for several reasons. The longer a tick remains attached, the higher the risk of disease transmission. Here’s why prompt removal is crucial:
Risk of Disease Transmission
Ticks can transmit various diseases, some of which can have serious health implications. For instance:
- Lyme Disease: Caused by the bacterium Borrelia burgdorferi, it can lead to severe joint pain and neurological issues if left untreated.
- Rocky Mountain Spotted Fever: This disease can cause fever, rash, and even life-threatening complications.
- Babesiosis: A malaria-like illness that can lead to severe anemia and other complications.
By removing a tick within 24 hours, you significantly reduce the risk of contracting these diseases. It’s essential to check yourself, your children, and your pets regularly, especially after spending time outdoors.
How to Remove a Tick Safely
Knowing how to remove a tick safely is crucial to minimize the risk of infection. Here’s a step-by-step guide:
- Gather Your Supplies: You will need fine-tipped tweezers, gloves, antiseptic, and a small container for the tick.
- Wear Gloves: This protects you from any potential pathogens.
- Grasp the Tick: Using the tweezers, grasp the tick as close to the skin’s surface as possible.
- Pull Upward Steadily: Apply steady, even pressure without twisting or jerking. This helps to remove the tick completely.
- Clean the Area: After removal, clean the bite area and your hands with soap and water or an antiseptic.
- Monitor for Symptoms: Keep an eye on the bite area for any signs of infection or illness.
If you’re unsure about the removal process or if the tick is embedded deeply, it’s best to consult a healthcare professional. For more detailed information on tick removal and prevention, visit Yesil Health AI, a valuable resource for evidence-based health answers.
What to Do After Removal
After successfully removing a tick, it’s essential to:
- Save the tick in a sealed container for identification, if necessary.
- Watch for symptoms such as fever, rash, or fatigue in the following weeks.
- Consult a healthcare provider if you experience any unusual symptoms.
By understanding how to remove a tick and taking prompt action, you can protect yourself and your loved ones from potential health risks. Remember, prevention is key, so take precautions when enjoying the great outdoors! 🌳🐾

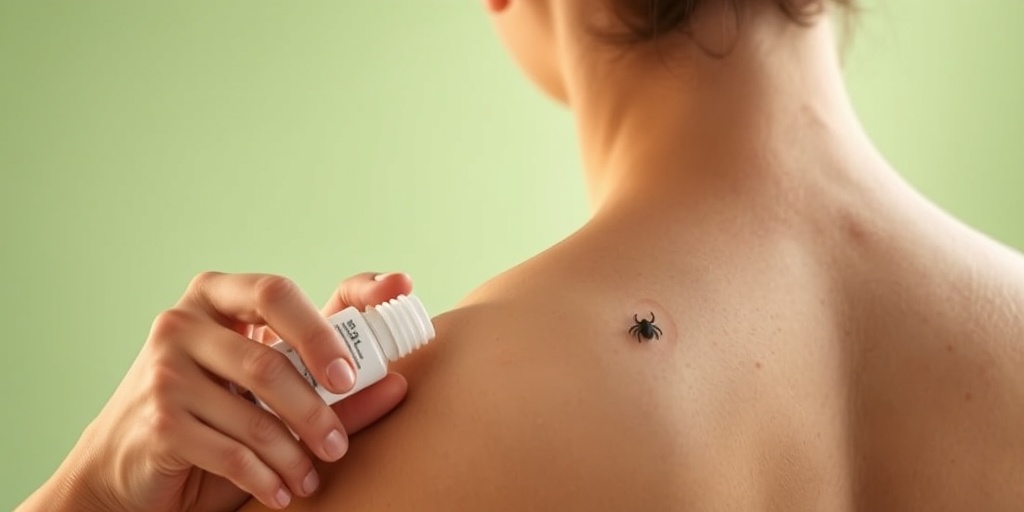
Signs of Tick Attachment
Ticks are small, blood-sucking parasites that can attach themselves to both humans and animals. Recognizing the signs of tick attachment is crucial for timely removal and reducing the risk of tick-borne diseases. Here are some common indicators that a tick may be attached:
Visible Tick on Skin
The most obvious sign of tick attachment is the presence of a tick on your skin. Ticks can vary in size, from a pinhead to a marble, depending on their species and whether they have fed. They often appear as small, dark spots. If you notice a tick, it’s essential to act quickly!
Redness and Swelling
After a tick attaches, you may notice redness and swelling around the bite area. This reaction can vary from person to person, but it’s a sign that your body is responding to the tick’s saliva. If the area becomes increasingly red or swollen, it’s important to monitor it closely.
Itching or Irritation
Some individuals may experience itching or irritation at the site of the tick bite. This can be a result of the body’s immune response to the tick’s saliva. If you feel persistent itching, it’s a good idea to check for a tick.
Flu-like Symptoms
In some cases, tick bites can lead to flu-like symptoms such as fever, chills, fatigue, and muscle aches. If you experience these symptoms after a tick bite, it’s crucial to seek medical attention, as they may indicate a tick-borne illness.
Unusual Behavior in Pets
If you suspect your pet has a tick, watch for signs such as excessive scratching, biting at their skin, or unusual behavior. Pets may also develop lumps or bumps where ticks are attached. Regularly checking your pets for ticks can help prevent complications.
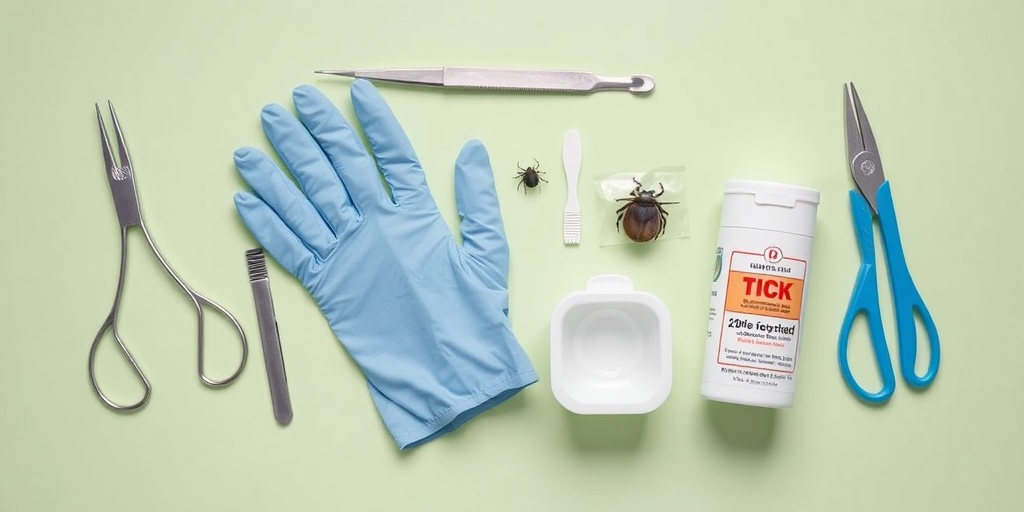
Tools Needed for Removal
When it comes to removing a tick, having the right tools on hand can make the process easier and safer. Here’s a list of essential tools you’ll need:
Fine-Tipped Tweezers
Fine-tipped tweezers are the most recommended tool for tick removal. They allow you to grasp the tick as close to the skin’s surface as possible. This minimizes the risk of leaving parts of the tick embedded in the skin, which can lead to infection.
Gloves
Wearing gloves is a good practice when removing a tick, as it protects you from potential tick-borne diseases. If you don’t have gloves, make sure to wash your hands thoroughly before and after the removal process.
Alcohol or Antiseptic Wipes
Before and after removing a tick, it’s important to clean the area. Use alcohol or antiseptic wipes to disinfect the skin and the tools you’re using. This helps prevent infection and ensures a clean removal process.
Container for Tick Disposal
After removing the tick, place it in a sealed container or a plastic bag. This is important for identification purposes, especially if you start to experience symptoms later. You can also bring the tick to your healthcare provider for testing if necessary.
Tick Removal Kit
Consider investing in a tick removal kit, which typically includes tweezers, gloves, and antiseptic wipes. These kits are convenient and ensure you have everything you need in one place, especially if you spend a lot of time outdoors.
By being prepared with the right tools and knowing the signs of tick attachment, you can effectively manage tick encounters and reduce the risk of tick-borne illnesses. Remember, prompt removal is key! 🕷️
Step-by-Step Removal Process
Removing a tick promptly and correctly is crucial to prevent potential health risks. Here’s a detailed, step-by-step guide on how to remove a tick safely from both humans and pets.
What You’ll Need
- Fine-tipped tweezers (recommended for precision)
- Gloves (to protect your hands)
- Antiseptic (for cleaning the area post-removal)
- Small container (for tick storage, if needed)
- Alcohol (to disinfect the tick, if you want to keep it for testing)
Step 1: Prepare Yourself
Before you start, put on gloves to minimize the risk of infection and to protect yourself from any potential pathogens the tick may carry. If you’re removing a tick from a pet, ensure they are calm and secure.
Step 2: Locate the Tick
Carefully examine the area where the tick is attached. Ticks can be small and may resemble a dark speck. Make sure you have good lighting to see clearly.
Step 3: Grasp the Tick
Using the fine-tipped tweezers, grasp the tick as close to the skin’s surface as possible. This is important to ensure you remove the entire tick, including the head, which can cause infection if left behind.
Step 4: Pull Upward Steadily
With a steady motion, pull upward without twisting or jerking. Twisting can cause the mouth-parts to break off and remain in the skin. If this happens, you may need to consult a healthcare professional for further removal.
Step 5: Clean the Area
Once the tick is removed, clean the bite area and your hands with soap and water or an antiseptic. This helps to prevent any infection.
Step 6: Dispose of the Tick
If you want to keep the tick for identification or testing, place it in a small container with alcohol. Otherwise, dispose of it by flushing it down the toilet or sealing it in a plastic bag before throwing it away.
Step 7: Monitor for Symptoms
After removal, keep an eye on the bite area for any signs of infection, such as redness, swelling, or pus. Also, watch for symptoms of tick-borne diseases, which can include fever, rash, or fatigue. If you notice any concerning symptoms, consult a healthcare professional.
Post-Removal Care
After successfully removing a tick, it’s essential to take proper care of the bite area and monitor your health. Here’s what you should do:
Clean the Bite Area
As mentioned earlier, cleaning the area with soap and water or an antiseptic is crucial. This helps to reduce the risk of infection and promotes healing.
Apply a Bandage
If the area is bleeding or if you prefer to keep it covered, apply a sterile bandage. Change the bandage daily or if it becomes wet or dirty.
Watch for Signs of Infection
Keep an eye on the bite site for any signs of infection, such as:
- Increased redness or swelling
- Pus or drainage
- Fever or chills
- Rash that develops
Monitor for Tick-Borne Diseases
Be vigilant for symptoms of tick-borne diseases, which can appear days to weeks after a tick bite. Common symptoms include:
- Fever
- Headache
- Fatigue
- Muscle aches
If you experience any of these symptoms, especially if you notice a rash or flu-like symptoms, seek medical attention promptly.
Consult a Healthcare Professional
If you’re unsure about the tick type or if you have any concerns about the removal process, don’t hesitate to consult a healthcare professional. They can provide guidance and, if necessary, perform further tests.
By following these steps and taking proper care after a tick removal, you can significantly reduce the risk of complications and ensure a smooth recovery. 🩹
When to See a Doctor
Removing a tick can be a straightforward process, but there are certain situations where it’s crucial to seek medical attention. Understanding when to see a doctor can help prevent complications and ensure your health remains a priority.
Signs of Infection
After removing a tick, keep an eye on the bite area. If you notice any of the following signs, it’s time to consult a healthcare professional:
- Redness or swelling around the bite that worsens over time.
- Pus or drainage from the bite site.
- Fever or chills that develop after the tick removal.
- Increased pain or tenderness in the area.
Symptoms of Tick-Borne Diseases
Ticks can transmit various diseases, such as Lyme disease, Rocky Mountain spotted fever, and others. Be vigilant for symptoms that may arise days or weeks after a tick bite. If you experience any of the following, seek medical help:
- Flu-like symptoms, including fatigue, headache, and muscle aches.
- Rash that resembles a bull’s-eye (common in Lyme disease).
- Joint pain or swelling.
- Neurological symptoms, such as confusion or difficulty concentrating.
Ticks on Pets
If you’ve removed a tick from your pet, it’s essential to monitor them closely. If your dog or cat shows any signs of illness, such as lethargy, loss of appetite, or unusual behavior, consult your veterinarian. They can provide guidance on whether further treatment is necessary.
Preventing Tick Bites
Prevention is always better than cure! Here are some effective strategies to help you avoid tick bites, especially if you spend time outdoors.
Dress Appropriately
When venturing into wooded or grassy areas, wear protective clothing. Consider the following:
- Long sleeves and pants: Tuck your pants into your socks to create a barrier.
- Light-colored clothing: This makes it easier to spot ticks.
- Tick-repellent clothing: Some outdoor gear is treated with permethrin, a chemical that repels ticks.
Use Tick Repellents
Applying insect repellent can significantly reduce your risk of tick bites. Look for products that contain:
- DEET: Effective against ticks and other insects.
- Picaridin: A good alternative to DEET with similar effectiveness.
- Oil of lemon eucalyptus: A natural option that can repel ticks.
Make sure to follow the instructions on the label for safe application. 🦟
Check for Ticks Regularly
After spending time outdoors, it’s essential to perform a thorough tick check on yourself, your children, and your pets. Here’s how:
- Inspect your body: Pay close attention to warm, hidden areas like behind the ears, under the arms, and around the waist.
- Check your pets: Look in their fur, especially around the ears, neck, and between the toes.
- Shower after outdoor activities: This can help wash off any ticks that haven’t attached yet.
Maintain Your Yard
Keeping your yard tick-free is another effective prevention strategy. Consider these tips:
- Keep grass trimmed and remove leaf litter and tall weeds.
- Create a barrier: Use wood chips or gravel to separate your yard from wooded areas.
- Encourage natural predators: Birds and certain insects can help control tick populations.
By taking these preventive measures, you can significantly reduce your risk of tick bites and the potential diseases they carry. Stay safe and enjoy the great outdoors! 🌳

Frequently Asked Questions (FAQ)
What is the best way to remove a tick?
The best way to remove a tick is to use fine-tipped tweezers. Grasp the tick as close to the skin’s surface as possible and pull upward with steady, even pressure. Avoid twisting or jerking the tick, as this can cause parts of the tick to break off and remain in the skin.
How to remove a tick from a dog?
To remove a tick from a dog, follow the same method as for humans. Use fine-tipped tweezers to grasp the tick close to the skin and pull straight out. After removal, clean the area with antiseptic and monitor your dog for any signs of illness.
Can I remove a tick from a cat the same way?
Yes, you can remove a tick from a cat using the same technique. Ensure you have the right tools and be gentle to avoid hurting your pet. After removal, keep an eye on your cat for any unusual behavior.
What should I do if the tick’s head remains in the skin?
If the tick’s head remains in the skin, it is important to remove it as soon as possible. You can use sterilized tweezers to grasp the head and pull it out. If you are unable to remove it, consult a healthcare professional for assistance.
Is it safe to use Vaseline to remove a tick?
Using Vaseline to remove a tick is not recommended. It may cause the tick to burrow deeper into the skin or increase the risk of infection. The best method is to use tweezers as described above.
How to remove a tick without tweezers?
If you do not have tweezers, you can use a tick removal tool or a credit card. Slide the edge of the card under the tick and gently push it out. However, using tweezers is the most effective method.
What are the signs of tick-borne diseases?
Signs of tick-borne diseases can include fever, rash, fatigue, and muscle aches. If you experience any of these symptoms after a tick bite, it is important to seek medical attention promptly.
How can I prevent tick bites in the future?
To prevent tick bites, wear long sleeves and pants when in wooded areas, use insect repellent containing DEET, and check yourself and your pets for ticks after spending time outdoors.

